Take a look at the website for the updated, discounted supplies and retired products are available to you at phenomenal prices. Check back often to take advantage of these products that are offered while supplies last!
Also, if you are in the Bothell area and want to attend a Magic Monday scrapbook workshop, March 21st, 7:00 p.m. you are welcome to join us. To prepare for the workshop, cut the papers for the Mystique layout pattern in the Magic book. Bring your scraps, photos, and foam tape and we will assemble and embellish at the workshop. My layouts are below...and don't be alarmed that mine are different than those in the book. We will used the same paper to create the layouts.
Hope you can join us!
Michele
So much more than crafting—it's about connection, community, and the friendships that blossom along the way. Yes, I offer workshops, classes, and retreats where I teach card-making, scrapbooking, and journaling techniques, but what truly matters is the sharing of stories, the support we give each other, and the laughter we share.
Showing posts with label Artwork. Show all posts
March 18, 2011
February 16, 2011
Show 'em your Heart! H2H challenge
I love it when I have completed a challenge and didn't even know it. In my attempt to "use what I have", I found these chipboard hearts from a long past CTMH special. Now we all know that banners are in and the Sweet Heart paper packet is perfect for Valentine's Day, so I began creating. Funny what I found that I could use in this project...remember the days of wire? I had some hot pink wire and used that to "string" my hearts. So much fun!
I did learn that I have a hard time taking photos of banners. Any hints anyone?
January 06, 2011
Soar with Wings and January Stamp of the Month
I used the bulk butterfly paper from wings and did the "puddle pad" technique as described by Kim Lohberg.
"For the multi colored images:
I used the baby wipe & re-inker technique – took a folded baby wipe and used Vineyardberry, Bamboo & Black re-inker squirted onto the wipe. There’s lots of ways to ink the baby wipe but I like to have a main line of a light color – I started with the bamboo – then added vineyard berry to one side towards the top and then the other side towards the bottom – then filled the rest in with the black. I LOVE the effect you get with this technique."
I place the baby wipe on my 4 x 6 block so I have a large, flat surface to work with. You can also see the "puddle pad" technique in the April 13th 2010 Art & Soul webisode "Live Your Dreams".
Give it a try...so much fun!
"For the multi colored images:
I used the baby wipe & re-inker technique – took a folded baby wipe and used Vineyardberry, Bamboo & Black re-inker squirted onto the wipe. There’s lots of ways to ink the baby wipe but I like to have a main line of a light color – I started with the bamboo – then added vineyard berry to one side towards the top and then the other side towards the bottom – then filled the rest in with the black. I LOVE the effect you get with this technique."
I place the baby wipe on my 4 x 6 block so I have a large, flat surface to work with. You can also see the "puddle pad" technique in the April 13th 2010 Art & Soul webisode "Live Your Dreams".
Give it a try...so much fun!
January 03, 2011
January Stamp of the Month: Find Your Style
I love, love, love this set, especially with the Wings paper packet but I can't wait to use it with other paper as well. And this month, you have two different ways to earn it free.
1. Place an order of $100 in product from the current idea book or Inspirations Brochure (Don't have one? Email me and I can send you one or you can see it HERE.)
OR
2. Purchase the WingsWorkshop On the Go from the Inspirations brochure and plus 4 different items from the brochure and get if for free. You can see the "best deal" HERE.
Inspired by Vicki Wizniuk.
You can shop on my website HERE or contact me to place an order.
December 08, 2010
More ornaments ideas!
Inspired by a CTMH Training Academy course and Shari F.'s motto of use what you have, I pulled out some chipboard "slides" and "shapes" that have retired and created these photo ornaments. The front is a chipboard covered with Mistletoe paper packet and Creative Basics. After cutting out the shape and gluing it to the chipboard, I used the Finishing Files to smooth the rough cut edges. The photos are cropped ad then attached to the back of the chipboard. Then I used the photo hangers, and red ribbon to create the hanger. A slightly larger piece of cardstock it attached to the back for a finishing touch. This would be an appreciated gift for grandparents and family. In addition, add one to your tree with the year stamped on it as a reminder of how your child has grown from year to year.
If you don't have the slides and shapes, CTMH has some new ornament shaped chipboard and you can use to create a similar project.
The kids in my Santa's Workshop were able to create and assemble these. Great gift ideas!
December 06, 2010
Meredith's Tree Farm
At our retreat this fall, Meredith was working on her holiday cards and asked for some ideas. Well, with a three day weekend ahead of us, I shared a tutorial I had seen by Tresa Black for a dimensional tree. Although they may be little time consuming to make,the results are a stunningly beautiful tree. These could also be used as an ornament. The stamp set used is "A Timber", stamped on Olive cardstock with New England Ivy ink, and the add sparkle with Glitz Glitter glue or Bitty sparkles. The original tutorial is here. The only bummer is that I don't have a close up of the finished tree. But enjoy Tresa's.
December 04, 2010
Snow, holidays, family, and creativity: Great things that keep me from the blog!
Wow, it has been a long time since I have posted but for all good reasons.
Snow days brought time in the "cabin" to be creative and now I can share those items with you! Enjoy.
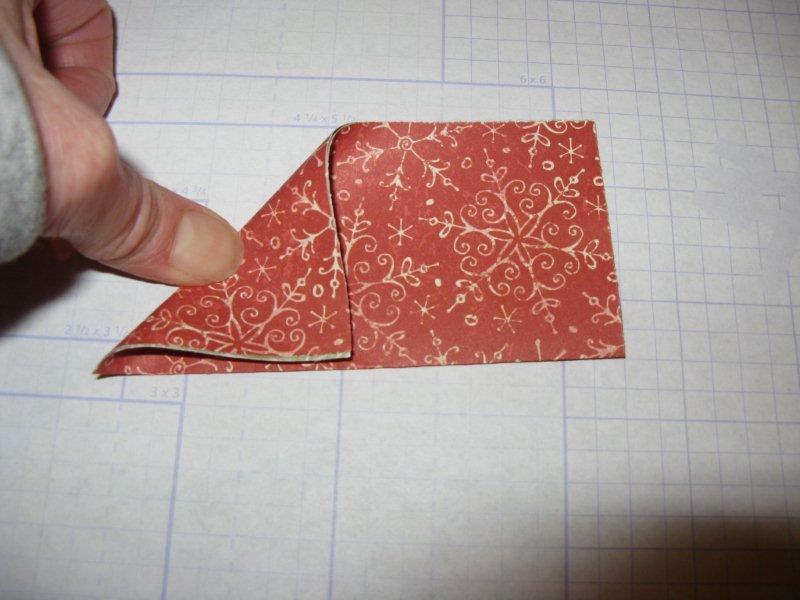
Christmas Stars made Mistletoe paper and snowflake brads. Here is the original tutorial. I also took some photos of my folding to hopefully help you out in your endeavor to create some of these stars. It is easy to change the size, just depends on the size of square you start with. This one is from a 4x4 square.
The following are each made from 12 x 12 square and make fun wall decorations.
And here are the photos and tutorial I have done to hopefully help.
Step 1: Fold your square in half.
Step 2: With the folded edge toward you, fold the left edge up to be even with the top. Crease your fold in the middle. This is the beginning of a guide point for future folds.
Step 4: Unfold your previous fold and repeat by bringing the top corner down so the edge is now even with the bottom fold. Again, crease well in the middle.
After you open up this fold, you will see a "X" to the left of your paper.
Step 5: Now bring the right corner to the "X" and crease well.
Step 6 : Now bring that corner back over to the right creating a "cone" on the right and crease.
Step 7: Bring the lower left corner up to meet the edges in the middle.
Step 8: Now fold the left side back to lay again the "cone" on the right.
It should look like this.
Step 9: Now cut along the line from the left point to the middle of the fold on the right side.
Your cut will look like this.
Step 10: Unfold and Mountain fold the points with valley folds between the points.
Ink the edges of all the folds and points with chocolate distressing ink.
And this is what it will look like when you are finished. Add a decorative brad to the center, a ribbon to the top and hang on your tree! (or wall)
November 20, 2010
Another Favorite thing: Nights like tonight
Jeff and I have been intentionally planning weekends with nothing on the calendar. It seems like we have struggled with that for a long time but it is finally becoming a reality and I am loving it. This is what it looks like tonight. Alli, the bookworm, pounds through page after page of anything she can get her eyes on and then wants to watch a "chick flick" with me. Marissa the socialite needs to do something with someone so we make paper Christmas ornaments together. She makes a plan to take orders to make and sell them so she can donate the money to World Vision Christmas project she is doing with her Sunday School class. Then off to her second birthday party of the day. Did I mention she is a socialite? Jeff putters. Those are his words. He paid bills, winterized the sprinkler system, made fun of our "chick flick", and then putters some more. Me, well I start getting creative. I of course took out my list of crafts I wanted to try (most included some paper ornaments I had seen) and created with Marissa. Then I pulled out some really old horse stamps and started making cards for Alli's horse trainer and our barn carpool partner. All in all, I love nights like tonight where you can let your being wander into whatever feels right. I will show you the photo of the horse notecards but will wait for the paper ornaments. I am planning a 12 days of ornaments blog series...don't want to spoil it for you.
November 19, 2010
One of my favorite things: Stars!
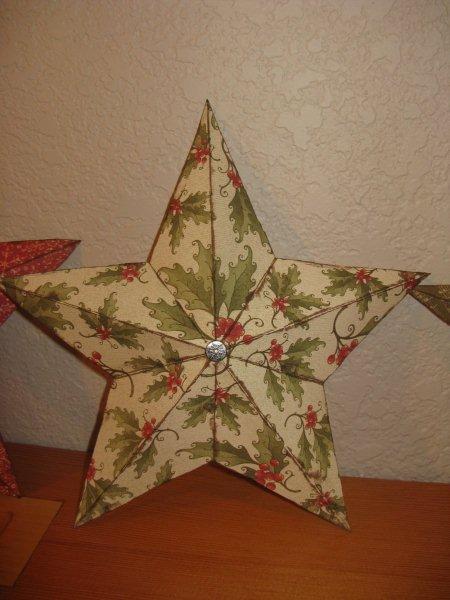
Full confession: I spend too much time browsing blogs. But, I do find some really cool things like an oragami pattern to make these stars! I did these stars starting with a 12 x 12 paper so they are fairly large. They are great smaller as well and can be used as a tree ornament. Here's the link to the tutorial I followed. The papers I used are from the Mistletoe paper packet and inked with a chocolate brown distressing ink. I then put a deorative brad from the Mistletoe embellishments in the middle. Give it a try and see what you think? I plan to make some smaller ones and will try to make a step by step tutorial to go with it so you have more than just the drawing shown on the link. Don't you think it would make a nice garland, strung together? May have to try that too!
November 01, 2010
What can you get from a Level One Kit?
I just love the CTMH Level 1 Scrapbooking Kits. These are great for those who are just getting started in scrapbooking or those with limited time to scrapbook. They are also a fun challenge who for those who like to create something out of the "intended" box. How can you resist the beautiful paper, themed stickease, and extra cardstock for creating? This idea is not new to the CTMH community but is often overlooked by the seasoned scrapbooker! With my inspiration from Christine A., I created this 6x6 mini album to use for the holiday highlights this year. Stay tuned for the scrapbook pages, cards and tags I will be creating from the rest of the kit.
Products used:
6x6 My Creations Memory Showcase $3.95
Mistletoe Level 2 Assortment $4.95
October 25, 2010
My 200th Post and H2H Challenge
Wow, when I started a blog, I wasn't sure if I would really be able to continue consistently and here I am at 200! I really have enjoyed sharing my creativity and thoughts and it has been a great outlet for me.
H2H is doing a Halloween/Fall challenge and I have done so many cards and projects this year, it is hard to decide what to share. As I look around my studio, this is one of my favorite cards and so I will share it.
The new opaques can be used in many different ways to dress up a card or scrapbook page. On the clear card, they make spooky little pumpkin eyes that are so cute. Enjoy this card and take a look at the other H2H challenge artwork. Be inspired to create and post your artwork as well.
Here's the card closed.
When the card is open, the eyes "float" on the clear front of the card.
October 22, 2010
Winter and Magnifique
Double duty here! I did a gathering with Lalia and her friends on Tuesday. Just love those gals from Sassy Scrappers! Anyway, she wanted to see the Magnifique so we had a great time playing together. I showed them how to do the emboss resist as shown in the first card. The shimmer brad makes a great winter moon and I love the little sparkle on the top of the tree!
H2H challenge was hosting an any kind of embossing challenge. This card fits the bill!
For this second card, I played with the glitter rub-ons. Now I often find myself a year behind the times and this was a new product last year and I didn't really jump in with it. Well, now that I have finally given it a try, I am asking myself "What were you waiting for?" Silly girl. It is cool to watch the image transform as you use the glitter sheet to add "color" to the image. The snowflake is the glitter rub-on but doesn't sparkle too much in this photo.
Oh and one more thing...I am getting ready for my "Holiday card buffet." These workshop will be two and a half hours long and you can come and make as many cards as you like, for $1 per card. Watch my newsletter for more details.
H2H challenge was hosting an any kind of embossing challenge. This card fits the bill!
For this second card, I played with the glitter rub-ons. Now I often find myself a year behind the times and this was a new product last year and I didn't really jump in with it. Well, now that I have finally given it a try, I am asking myself "What were you waiting for?" Silly girl. It is cool to watch the image transform as you use the glitter sheet to add "color" to the image. The snowflake is the glitter rub-on but doesn't sparkle too much in this photo.
Oh and one more thing...I am getting ready for my "Holiday card buffet." These workshop will be two and a half hours long and you can come and make as many cards as you like, for $1 per card. Watch my newsletter for more details.
October 18, 2010
Birthday Banner
Finally finished. I started this for the H2H challenge a couple of weeks ago and just didn't find the time to complete it. So before starting anything new, I sat down and put on the final touches. Although...I think the cupcakes may need candles now that I see it hanging up. Nothing is ever really finished, just a work in progress.
It is hard to see the glitter in the photo of the whole banner but it really is sparkly and gives more contrast to the letters. Candles or not? Anyone have an idea?
October 13, 2010
October Stamp of the Month: Sharing the Magic
Every month Close To My Heart offers you an exclusive My Acrylix® D-size stamp set FREE or at a large discount. The stamp set is available to qualifying customers for that month only. It’s our way of saying thank you, and your way of getting fantastic deals on our amazing stamps! To view more artwork, grab your favorite beverage and enjoy this blog hop!
Here’s how to get a fabulous deal on your very own Stamp of the Month!
You spend You save You pay only
$25 order 25% off $17.21
$50 order 50% off $11.48
$75 order 75% off $5.74
$100 order 100% off FREE!
Here’s how to get a fabulous deal on your very own Stamp of the Month!
You spend You save You pay only
$25 order 25% off $17.21
$50 order 50% off $11.48
$75 order 75% off $5.74
$100 order 100% off FREE!
Subscribe to:
Posts (Atom)