Showing posts with label Tutorial. Show all posts

October 03, 2016

Can you color too much?

I started a new coloring group this past weekend.  It is so relaxing to sit around with a group of ladies and just color! 


Because of the season, we started with leaves and fall colors.  The trick is, CTMH doesn't carry a lot of fall colors in the Shin Han set but what they did do, was provide a color recipe for all 40 exclusive colors. 

I choose Poppy, Goldrush, Desert Sand and Canary for my fall color selection (and to coordinate with Swan Lake paper packet).  Creating those 4 colors required layering of different colors to create the desired color.
  • Poppy= clay, lt orange, carmine, and pastel green
  • Goldrush= clay and marigold yellow
  • Desert Sand= pastel green and clay
  • Canary= Lt. orange and Pastel green 3x's
When you layer the inks in the order above, you do get the colors you are looking for!  It really is magic!  If you would like the "recipe" for the CTMH colors made from our 25 Shin Han markers, contact me and I will email you the file. 

Another technique I shared with my coloring groups is creating your own coloring pages (which you can then turn into beautiful cards).

For this month I used the Lovely Leaves stamp set
One of the benefits of My Acrylix stamps is that multiple stamps can be added to a single block to create "one" stamp.  I arranged the leaves on the block below, using a "triangle" pattern to use for random stamping.  You can see the idea of "triangle" random stamp here


Then using Memento Black ink, which, when dry, resists bleeding with alcohol markers, I stamped on White Daisy cardstock, nesting the leaves together.  When you look closely, you can see a pattern but when colored and then cut up for cards, the pattern becomes random.  (My sheet of paper is 5.5 x 12, easy to cut into 5.5 x 3 pieces to create 4 cards.)


Finally, after coloring my leaves and cutting, I added a touch of Swan Lake paper and coordinating cardstock to create this card. 

"Happy Fall" is from the Woodland Critters stamp set.  
If you are local and would like to join my coloring club, we meet the first Saturday of the month.  Each month, for 6 months, you receive 4 Shin Han markers and supplies to create 3 cards.  If you are not local, but would like a kit, these are also available. 

Enjoy the fall colors,
Michele


October 31, 2014

Stamp of the Month Blog Hop: It's the little things


Welcome to our Stamp of the Month Blog Hop!  We will be featuring November's SOTM, which is It's the Little Things, a set of 15 floral and sentiment stamps.  If you have come here from Krista's Blog, you are on the right path! The blog hop is a great big circle, so you can start here and work your way all around.  If you get lost along the way, you’ll find the complete list of participating consultants on Melinda’s Blog:  http://ifyoublingit.blogspot.com/p/stamp-of-month-blog-hop-list.html.

 This is simple to do - just click on the link at the end of the post on each blog to move to the next one! Here we go!

I created a layout with the stamp set and the random stamping technique.  I started with a 12 x 12 piece of white cardstock and stamp the images using this technique


Then I used the paper as I would a patterned paper and created a layout. 

Finally, I stamped and cut out the same floral images and create a focal point on my layout and added the "title".

And guess what is next?  I loved how the focal point turned out so I turned it into a card!

Stamps can be used in so many different ways; make your own paper, create a focal point with title, AND make greeting cards. 

Now "Hop" on over to Morgan's Blog to see her work! Be sure to visit all the Consultants at their Blogs to get some great crafting ideas and other fun ideas! Remember, the SOTM is only available until !  Contact your CTMH Consultant (or click here) to see how you can get this stamp set at a discount!

Here are the products I used to create the items in this post.  


Happy hopping,
Michele

October 25, 2013

Let’s start the weekend off right!

I have been a bit absent on my blog in the past few weeks.  Working hard, I am, a creating with the new Artbooking cartridge among other things.  So, to start your weekend off right, I will begin by sharing some of the Artbooking Made Easy Videos…and you can expect some of my Artbooking creations to follow in future posts. 

I am not sure if I have shared any of these videos from Close to My Heart.  It is a running series so I will start with the beginning with the first two and try to catch you up.  You can see all the videos when you visit the CTMH Youtube channel here

Have a great weekend!

September 02, 2013

I was not abducted!

But I have been having a fabulous summer with my family!  I have many adventures to share and will do that when we get together for classes this fall, but let’s down to business!  Yes, creative business!
0913_SOM
Start with the stamp of the month for September.  I love this set!  The style of the Subway Titles is one of the “looks” I have tried to create in my past artwork.  I love it! 
This set makes it fun and easy to create different looks with words.  Take a look at the video below which shows different ways to use the set.  Then, put September 16th on your calendar.  I will be hosting a class in my home at 7 p.m. and we will use this stamp set and some fun techniques to create 5 cards for 15 dollars or, invite a friend to join you and you each pay only 10 dollars.  Don’t forget to RSVP so I have time to prepare your supplies!


July 26, 2013

Tutorial: Japanese Doll

Remember the Japanese doll card I created this past spring?  Well, I made a photo tutorial of how I created her dress.  This little lady would be fun to create in a variety of paper packets so if you don’t have Dream Pop, then try something new! 
Close to My heart - ctmh- Dream Pop -Oval -Japanese
Cut three ovals the same size.
Close to My heart - ctmh- Dream Pop -Oval stack -Japanese
Layer the ovals to create the design you like.  Adhere them together.
Close to My heart - ctmh- Dream Pop -Oval back stack -Japanese
Flip the three adhered ovals over.
Close to My heart - ctmh- Dream Pop -Oval trim -Japanese
Use your micro tip scissors to trim off the access from the side ovals, creating your original oval shape.
Close to My heart - ctmh- Dream Pop -Oval front -Japanese
Turn back to the right side and trim just a small piece off the bottom of the underneath oval to “flatten” the

bottom edge.  (sorry for the blurry photo)

Closetomyheart-CTMH-DreamPop-Cricut-ArtPhilosophy-JapaneseDoll
For the face, I cut a circle from champagne colored cardstock and for the hair, I cut a second circle, 0.2 inch larger than the face, in black.  Cut out wedge for hair. 
Finally, I used this tutorial for my inspiration.  I love all the different “hairstyle” options she tried.  Gonna have to play some more with this pattern. 

July 16, 2013

Creative Vacation

I am spending a few days with my friend Trisha and we are creating at our whim!  When I return I will have lots of fun new artwork to share with you but in the mean time, how about some information that can help you with your creative endeavors?


This is one of the sets I am bringing with me.  Can't wait to play.


March 08, 2013

Fantastic Fabric!

Learn great tips and techniques for using fabric in your artwork—where to use it, how to adhere it, and how to create ruffles, flowers, and much more! Close To My Heart's new line of beautiful textiles make it simple to embellish cards, layouts, and three-dimensional items with fabric.

Watch my blog for some more ideas about how to use fabric in your papercrafting. 

December 26, 2012

Getting the most out of your inks and stamps

Learn about generational stamping, coloring in stamped images, and creating your own stamped pattern by going back to the basics for results you’ll love!

December 17, 2012

Perfect Fit

Use our Perfect Fit stamp sets featuring frames, sentiments, and images that fit together to create a fashionable message or accent. Pair your sentiment or image with a gift box made using our Cricut® Artiste cartridge for a sweet surprise for neighbors and friends!

December 07, 2012

Cluster Stamping

Embellish a page or card with a cluster. You can create a clustered look with multiple stamp images for a cute and coordinated design!  The versatility of CTMH clear acrylic stamps is a bonus for your creativity. 

February 04, 2012

Cluster Stamping

Embellish a page or card with a cluster. You can create a clustered look with multiple stamp images for a cute and coordinated design!  The versatility of CTMH clear acrylic stamps is a bonus for your creativity. 

April 18, 2011

D 1468 One this Day

This stamp sets offers versatility and functionality to your cards or scrapbook pages.  Take a look at this video to see some great ideas on how you can use it to create fun cards, document dates on your scrapbook pages and layer for a fun effect.

February 23, 2011

Close to My Heart has punches...with stamps to match!

New to the Spring/Summer Idea book is a 2" scalloped flower punch.  Last idea book, we also sold a 1 1/4" circle punch.  Here's a video showing how CTMH creates their stamps and punches to coordinate making your creating faster, simpler, and easier!

The scallop punch (z1392) is $14.95 and the circle punch is $12.95.

February 11, 2011

More Pink

Close to My Heart has a new pink ribbon collection that is so beautiful!  I just got mine and perfect timing for this video tutorial!  Take a look. 

December 06, 2010

Meredith's Tree Farm

At our retreat this fall, Meredith was working on her holiday cards and asked for some ideas.  Well, with a three day weekend ahead of us, I shared a tutorial I had seen by Tresa Black for a dimensional tree.  Although they may be little time consuming to make,the results are a stunningly beautiful tree.  These could also be used as an ornament.  The stamp set used is "A Timber", stamped on Olive cardstock with New England Ivy ink, and the add sparkle with Glitz Glitter glue or Bitty sparkles.  The original tutorial is here.  The only bummer is that I don't have a close up of the finished tree.  But enjoy Tresa's. 


December 04, 2010

Snow, holidays, family, and creativity: Great things that keep me from the blog!

Wow, it has been a long time since I have posted but for all good reasons. 

Snow days brought time in the "cabin" to be creative and now I can share those items with you!  Enjoy.

Christmas Stars made Mistletoe paper and snowflake brads.  Here is the original tutorial.  I also took some photos of my folding to hopefully help you out in your endeavor to create some of these stars.  It is easy to change the size, just depends on the size of square you start with.  This one is from a 4x4 square. 

The following are each made from 12 x 12 square and make fun wall decorations. 

And here are the photos and tutorial I have done to hopefully help. 

Step 1:  Fold your square in half.


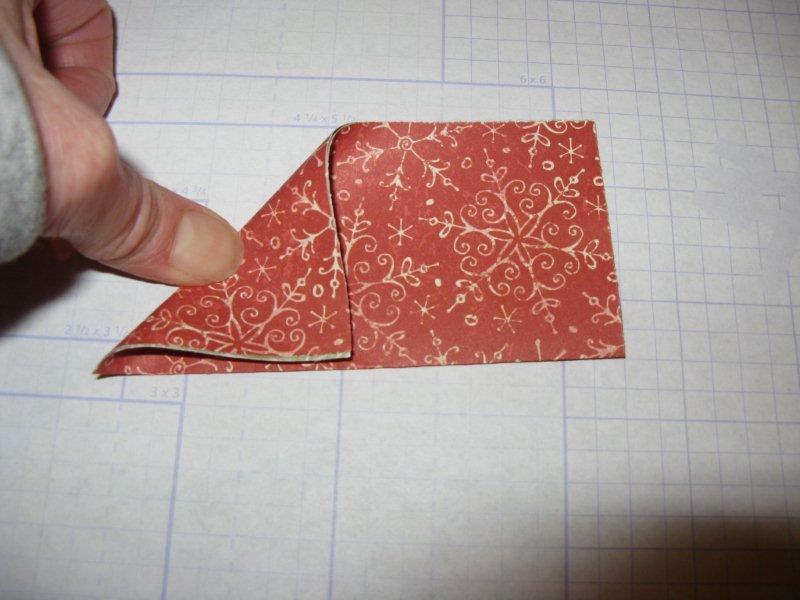
Step 2:  With the folded edge toward you, fold the left edge up to be even with the top.  Crease your fold in the middle.  This is the beginning of a guide point for future folds.


Step 4:  Unfold your previous fold and repeat by bringing the top corner down so the edge is now even with the bottom fold.  Again, crease well in the middle. 
After you open up this fold, you will see a "X" to the left of your paper.


Step 5: Now bring the right corner to the "X" and crease well.


Step 6 :  Now bring that corner back over to the right creating a "cone" on the right and crease.


Step 7:  Bring the lower left corner up to meet the edges in the middle. 


Step 8:  Now fold the left side back to lay again the "cone" on the right. 

It should look like this. 


Step 9:  Now cut along the line from the left point to the middle of the fold on the right side.


Your cut will look like this. 


Step 10:  Unfold and Mountain fold the points with valley folds between the points.


Ink the edges of all the folds and points with chocolate distressing ink.


And this is what it will look like when you are finished.  Add a decorative brad to the center, a ribbon to the top and hang on your tree!  (or wall)


June 02, 2010

More Cherries?

Yes, here is another project done with Cherry - O paper (x7123B).  This mini album is made using Flip Flaps (Z4114) as the recipe/photo holders.  Give this as a gift to a bride to be or share your special recipes with your family.  Keep one for yourself with your favorite recipes close at hand.  I will post a photo tutorial in a few days on how to make one. 
Inside

April 09, 2010

More altering for dimensional elements

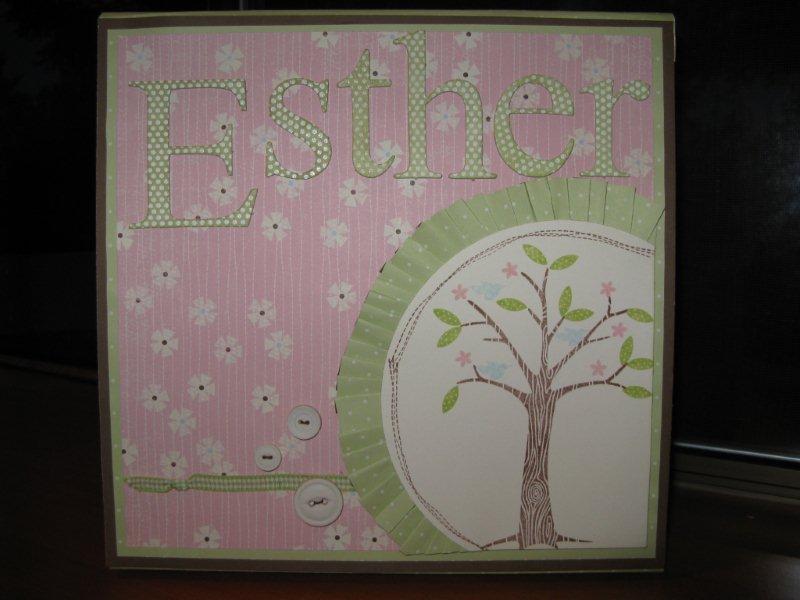
I just love our My Creation Memory Keepers.  I have lost count of how many boxes I have decorated and given as gifts.  They are so much fun to make!  I made this one for my expected niece, scheduled (can you schedule a birth?) to arrive in late May!  I learned something new!  Using the CTMH Bonding Memories Glue is the easiest and best way to adhere the paper to the box.  It worked like a charm. 

I also used a combination of paper packets, Topstitch and Magic Moments, to create the color scheme to match the nursery.  The letters that spell her name were created with dimensional elements, heat embossing and sponging to get the polka dot affect.  See below for the step by step process. 


First, the supplies you need include:  dimensional elements of your choice.  I love the CTMH product because they are white!  An easy base to start with.  Add Spot on Backgrounds stamp set, Versamark ink, White or Clear embossing powder, Craft Heater, Craft tray (shown in blue in following photo), colored ink of choice, sponge. 


First, use your versamark ink to stamp the desired "texture" onto the letter.  It is ok to stamp on a couple of letters because the ink will stay moist to accept the embossing powder. 

Set the letter in the craft tray, sprinkle liberally with white embossing powder, and tap off the extra.  The craft tray makes it easier to return the excess powder back into the container for future use!  It has a small "funnel" mouth at one end for easy pouring. 

Using the craft heater and a small pointed tool like the paper piecer or embossing tool to hold the letter in place, begin heating the letter until you see the embossing powder change from a dull to a shiny look.  Make sure to move the heater all over the letter to emboss all of the "texture" image. 

This is what the letter looks like after the heating.  You can even stop here for a fun texture for your letters.

To add color contrast, sponge the ink over the letter and continue until you get the color coverage you like.  You can then wipe the letter with a tissue and the embossed "texture" will come cleans and show the contrast of the background. 

This is what your final product looks like.  Now get out your dimensional elements and give it a try!  I would love to hear your ideas and thoughts about how this worked for you!