Showing posts with label Gift Ideas. Show all posts

February 27, 2017

Hello Lovely Card and Scrapbook Workshops

Spring is in the air...especially when you open the Seasonal Expressions catalog.  The Hello Lovely paper packet breaths just a bit of spring into my cloudy rainy day.  During the month of March, I will be featuring this paper packet in my workshops.


Beginning with the Workshop Your Way kit and inspiration from Tina Lovell and Laura Ryan, I created three double page layouts.


This workshop can be purchased on my website.  You can download a guide to create the pages made by the CTMH art department.  Or, if you would like to attend one of my workshops, visit EVENTS on my Facebook page.

These papers also make beautiful cards.  With the help of Lisa Stenz, another talented consultant, I am able to offer this card workshop.   You can see the details in the EVENTS.


Looking forward to creating with you soon.
Michele

October 16, 2016

City Sidewalks: Digital Cricut Collection Blog Hop

There's a hidden gem tucked in the Holiday Expressions and you will find it here!  Welcome to the City Sidewalks Digital Cricut Blog Hop.


Did you find it?  It is on page 43.  If you came here from Corinna's Blog, you are continuing on a loop to see the wonderful artwork created with this Cricut collection.  After enjoying the artwork here, you will move on to Darlys' Blog.    What happens if you get lost along the way?  Take a look at the list of hoppers and find where you left off here on Melinda's page

You can dress up your artwork in holiday style with the festive images from the mini digital Cricut collection.  It coordinates with our City Sidewalks paper packet so you can complete your Christmas projects in less time. 

My artwork features a set of 6 gift tags using City Sidewalks. 

The first three tags include Cricut cuts from our City Sidewalks collection.  One of my favorite images is the swirling wreath on tag number three.


In addition to the Cricut cartridge and the paper packet, I used Z3090 Red enamel gems, M1152 Mini Christmas, and D1697 Perfect Presents stamp sets. 

Now that you have been introduced to this gem, move on over to your consultants website and add the digital collection to your cart!  If you don't have a consultant, you are welcome to shop on my website

And also remember it is time to move on to Darlys' blog to see what she has created! 

Enjoy crafting for the holidays with Close to My Heart products.

Michele


May 14, 2015

Jackson Seasonal Sampler

Each month I create and hold a workshop called the Seasonal Sampler.  You may have seen these throughout the year.  I say this each month, but I truly think this is one of my favorite!

This sampler was inspired by the layout in the Seasonal Expressions 2 and is a perfect theme for the summer in the Pacific Northwest. 

I used the Campfire Lifestyle stamp set, Art Philosophy Cricut Cartridge, Artbooking Cartridge and pigment inks for lasting stamp images. 


If you are interested in creating this, you can attend one of my workshops (contact me for dates) or to order a kit. The kit is $15 plus shipping.   Order by May 20th for June workshops. 

Happy Stamping,
Michele

May 12, 2015

College Finals Care Package

My daughter and I have a special "greeting" to say hello via text when she is away at college.  "woof"  When I saw the Friendly Pets stamp set, well, it was perfect.  As she heads into finals this week, she will have special little stress-relieving gifts to open each day.  The dollar store had this cute paper and the stamp set was perfect for my tags. 


I used my Art Philosophy Cricut Cartridge to cut the Saddle Brown heart tag and then I hid the contour on the same tag and cut it in Pear cardstock.  I even cut the white square on my Cricut and stamped the tags with our little greeting!  So simple yet personal. 


You can purchase the Friendly Pets stamp set and Art Philosophy Cricut cartridge on my website


"Woof"
Michele

December 04, 2013

A fun gift idea!

The subway technique is a fun trend in crafting. Intrigued? Learn how to do it yourself using the My Creations™ 6" × 6" canvas display and your own creativity by watching the video.
I am so going to do this!  Can’t wait to try this out. 


March 04, 2011

March Stamp of the Month & Easter "Basket"

Target's $1 section is tempting to peruse and when they started caring Valentine items (the day after Christmas), I found these handled boxes.  Many of them had pre-printed hearts on them but I went through the bin and found a few that were white and kraft without any printing!  I struck gold!  How fun to alter them with our stamp of the month and create Easter Baskets. 

Take a look at what I created and then let me know if you want to make one,or maybe a couple, at my workshop on March 29th 7 p.m.  Workshop fee is $10 and includes a blending pen to take home for future projects.  Additional boxes without the blending pen are $5.  Looking for more of pink color?  Choose the option to create your project with the Sophia paper pack which you can see here.  Sign up by March 18th to reserve your space.


Here's another box that can be filled with goodies for an Easter gift.  This project was inspired by the talented Lisa Stenz and can be created at the workshop for $8 and also includes the blending pen.  Add some Easter grass in each side and a few chocolate eggs and you have a sweet surprise! 


June 02, 2010

More Cherries?

Yes, here is another project done with Cherry - O paper (x7123B).  This mini album is made using Flip Flaps (Z4114) as the recipe/photo holders.  Give this as a gift to a bride to be or share your special recipes with your family.  Keep one for yourself with your favorite recipes close at hand.  I will post a photo tutorial in a few days on how to make one. 
Inside

May 24, 2010

My Creations Recipe/ Photo Box

It will be a Cherry kind of week here on my blog.  I haven't really taken the time to feature the new products in the summer idea book so now is the time! 

The My Creations Recipe/Photo Box (z1322) in made of sturdy, stampable chipboard.  It fits 4x6 recipe cards, photos and index cards.  The new Originals Sugar & Spice recipe card kit (x8625) was made to fit this box too! 

For my box, I used CTMH Bonding Memories Glue (1512) to adhere Cherry-O Level II paper packet (x 7123B).  I stamped the stitched borders of the paper with the stamp set "Togetherness" (D1402), used Clear Buttons (z1155) adhered to B&T with the glue, and Chocolate Waxy Flax (z1088).    The recipe card kit is shown inside.  The word "recipe" was created by sponging the "Irresistibles Lots of Dots" letters (z1261) with Chocolate ink.  The project took a very short time and I am looking forward to filling it with recipes and taking it to our cabin. 

I am working on another box that will have my photos "to be scrapbooked" in it.  This will be an easy way to sort and prep photos so they are easily accessible on my desk when I have time to scrapbook.  Other ideas for this box?  What about a box of treasures for a child?  What about a cleaning card box?  Check this idea out here

Watch for a workshop to create your own box coming up in June. 


April 09, 2010

More altering for dimensional elements

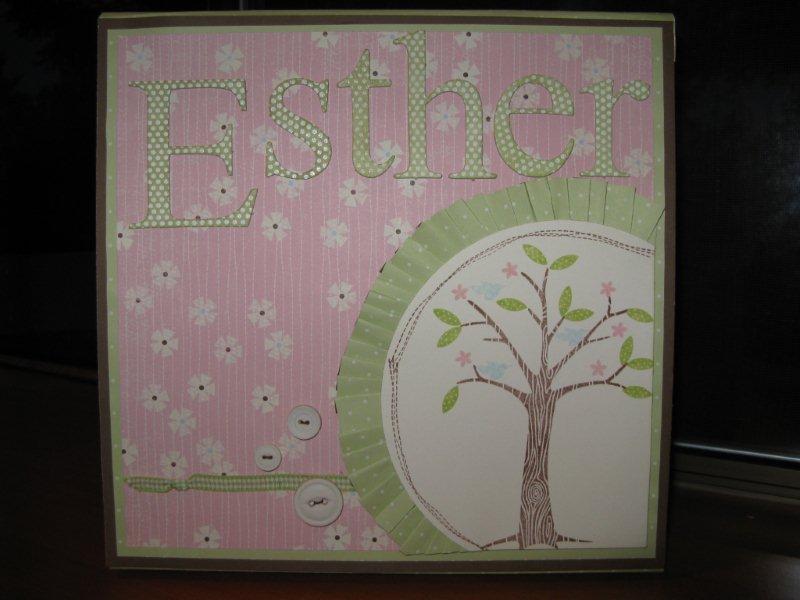
I just love our My Creation Memory Keepers.  I have lost count of how many boxes I have decorated and given as gifts.  They are so much fun to make!  I made this one for my expected niece, scheduled (can you schedule a birth?) to arrive in late May!  I learned something new!  Using the CTMH Bonding Memories Glue is the easiest and best way to adhere the paper to the box.  It worked like a charm. 

I also used a combination of paper packets, Topstitch and Magic Moments, to create the color scheme to match the nursery.  The letters that spell her name were created with dimensional elements, heat embossing and sponging to get the polka dot affect.  See below for the step by step process. 


First, the supplies you need include:  dimensional elements of your choice.  I love the CTMH product because they are white!  An easy base to start with.  Add Spot on Backgrounds stamp set, Versamark ink, White or Clear embossing powder, Craft Heater, Craft tray (shown in blue in following photo), colored ink of choice, sponge. 


First, use your versamark ink to stamp the desired "texture" onto the letter.  It is ok to stamp on a couple of letters because the ink will stay moist to accept the embossing powder. 

Set the letter in the craft tray, sprinkle liberally with white embossing powder, and tap off the extra.  The craft tray makes it easier to return the excess powder back into the container for future use!  It has a small "funnel" mouth at one end for easy pouring. 

Using the craft heater and a small pointed tool like the paper piecer or embossing tool to hold the letter in place, begin heating the letter until you see the embossing powder change from a dull to a shiny look.  Make sure to move the heater all over the letter to emboss all of the "texture" image. 

This is what the letter looks like after the heating.  You can even stop here for a fun texture for your letters.

To add color contrast, sponge the ink over the letter and continue until you get the color coverage you like.  You can then wipe the letter with a tissue and the embossed "texture" will come cleans and show the contrast of the background. 

This is what your final product looks like.  Now get out your dimensional elements and give it a try!  I would love to hear your ideas and thoughts about how this worked for you!


March 03, 2010

Topstitch workshop coming up!

This weekend I will be offering a scrapbook and card workshop using Topstitch.  For $5, you can create a set of cards and this adorable butterfly basket or a double page layout, fully embellished!  There is still time to join us.  Friday, March 5 9:30 a.m., Saturday, March 6 6:30 p.m. and Sunday, March 7th 6:30 p.m.  If you are in the Seattle area and want to come, please email me so I can have a kit ready for you! 

I am looking forward to using these baskets for Easter decorations and May day gifts.  Come learn how simple they are to make!


Just needs a title and a bit of journaling.  As you can see, I used beach photos but other themes include Easter, baby girl, add more blue for baby boy.  What themes would you use?

February 02, 2010

A wedding gift on the Veranda: Faster, Simpler and Easier!

This past weekend I attended a wedding shower for a friend.  I really wanted to make a gift for her but started a little late.  I made the card first, figuring I could shop from her registry if I needed too.  The paper spoke for itself so I added a sentiment, some ribbon, brads, and a butterfly from the Just Blooms and was very satisfied with the finished product. 


Then, I started making a keepsake box.  I used the My Creations Memory Keeper and covered it with the Veranda paper.  I used Modge Podge to glue the paper to the box (but did not Modge Podge over the paper as this causes lots of wrinkling).  Again, I finished this box very quickly because the beautiful, coordinating paper made it easy.  I was pleased with this special place to keep wedding mementos and a place for a photo on the front. 

Do I have time to do another project for my gift?  Full confession here.  I wasn't sure I could add to it so as we were out running errands, we bought a gift card to compliment the treasure box.  Then, we came home and I discovered I had a couple of hours in the evening so I delved into a 9x9 Accordian Album which fits perfectly in the memory keeper.  Using some inspirational artwork from another consultant, I started and completed this album.  Close to My Heart...Faster, Simpler, Easier!  And it was such a delight to see her appreciation for my gift, knowing I had made it, coordinated the papers to match her wedding colors, and had so much fun! 

January 18, 2010

Family Birthday Book

Ever forgotten a birthday?  Keeping track of birthdays can be hard sometimes.  This small 3 ring binder with a page for each month is beautiful and functional.  Created using the Veranda Level 1 paper packet, My Creations 3 Ring Binder, Antique Copper Mini Medley, and Today's Date Acrylic, Confidential, and Save the Date Acrylix stamp sets.  The lettering on the cover is from the stickease included in the kit and is used throughout for more embellishing.

Create this 5x7 mini book with me on Saturday February 6th at 3 p.m.  The cost for all the supplies is $25 (includes shipping and tax).  Order your kit by January 28th (contact me to RSVP for workshop) to assure its arrival!  If you are not able to make it to the workshop, when you order the supplies, I will send you the cutting guide to create your own book.  I am looking forward to filling my book with birthdays...and hopefully this will help me be less forgetful.