If you haven't, it is a mini album documenting the 25 days leading up to Christmas. I believe it is a registered trademark of Ali Edwards, a wonderful story teller, teacher and artist in the scrapbook world. (Read to the bottom! I have a special for you!)
Intriguing? What is the story of your December as your family begins celebrating the traditions of the holiday season? Have you ever documented these traditions? Do you remember your childhood traditions?
Close to My Heart does not have an exact replica of the "December Daily" as created by Ali Edwards but we do have products that you could use to create your own mini album and tradition record of December 2015.
Begin with this 30 page – 8¼" × 6½" mini album with a mix of papers: printed vellum; printed,
cardstock-weight; and page protectors in various styles. Kraft hardcover
with foil gold accent, wire-bound.
From here, you can just add your own photos and journaling telling the story of your December and holiday traditions OR you can add some detail with the Holiday Happenings Assortment.
This set of cards, mini envelopes and stickers allow you to add special details highlight moments and memories.
Finally, you can add some more dimensional detail with the Holiday Happenings Badge Buttons.
Created to coordinate perfectly with the album and assortment, you can add these special badges to finish off your album.
Wait, that is not all. Of course what is December without sparkle? When you purchase this set of three items in the Holiday Happenings Mini album set by November 30th, I will add a free package of Assorted Sparkles to make it shine! Shop on my website here.
This special is only through me, Independent consultant and all products are while supplies last. This would also make a special gift for a family with a new baby or newly married couple.
Happy memory keeping,
Michele
So much more than crafting—it's about connection, community, and the friendships that blossom along the way. Yes, I offer workshops, classes, and retreats where I teach card-making, scrapbooking, and journaling techniques, but what truly matters is the sharing of stories, the support we give each other, and the laughter we share.
November 16, 2015
November 01, 2015
November Stamp of the Month Blog Hop: Dream Big
How do you document the goals you have set for a new year or season of life? That is a great question I am asking myself these days. Close to My Heart is offering a stamp of the month that might help me...and you!
Welcome to the Stamp of the Month Blog hop for the "Cheers" stamp set!
If you have arrived here from Chris's Blog, you are traveling right along. After you have visited here, you will hop on over to Darlys' Blog to see what she has created with this fabulous set of stamps.
Now for me! I was thinking birthday for the sentiment "Dream Big" and I wanted to try my hand with the new Urban paper packet. So, I stamped the sentiment in Peacock Pigment ink and then heat embossed with a combination of silver and clear embossing powder. I was looking to get a rough metallic look to go along with the Urban style. So, here's what I got!
Now you can't really appreciate the heat embossing look here... but you will have to take my word for it or come see it in person. I also added some ink to paper distressing and then the shiny silver foil tape to top it off. I love how it turned out.
Remember, this set of stamps is only available during the month of November from your CTMH consultant or myself. You can purchase this set for $17.95 OR save a bit of money and get it for $5 with a minimum purchase of $50.
Now remember, when you are finished here, hop on over to Darlys' Blog to see her artwork!
Enjoy some creative time,
Michele
Welcome to the Stamp of the Month Blog hop for the "Cheers" stamp set!
If you have arrived here from Chris's Blog, you are traveling right along. After you have visited here, you will hop on over to Darlys' Blog to see what she has created with this fabulous set of stamps.
Now for me! I was thinking birthday for the sentiment "Dream Big" and I wanted to try my hand with the new Urban paper packet. So, I stamped the sentiment in Peacock Pigment ink and then heat embossed with a combination of silver and clear embossing powder. I was looking to get a rough metallic look to go along with the Urban style. So, here's what I got!
Now you can't really appreciate the heat embossing look here... but you will have to take my word for it or come see it in person. I also added some ink to paper distressing and then the shiny silver foil tape to top it off. I love how it turned out.
Remember, this set of stamps is only available during the month of November from your CTMH consultant or myself. You can purchase this set for $17.95 OR save a bit of money and get it for $5 with a minimum purchase of $50.
Now remember, when you are finished here, hop on over to Darlys' Blog to see her artwork!
Enjoy some creative time,
Michele
October 10, 2015
Trick or Treat!
We don't have trick or treaters in our neighborhood but I do like to give out treats to friends and family who come for a visit during the week of Halloween. Really, I have the most fun making the treat delivery cute!
You can create fun and cute ways to deliver your sweet goody this Halloween!
Here I used the Designer bags, Nevermore paper and the Artbooking Cricut cartridge to design tags for my treats. The little broom is a lollipop wrapped in a strip of Nevermore paper and tied with Thistle thick twine. Color the stick brown with the Shin Han markers (permanent so the ink won't run during consumption). Oh yeah...notice the blank white space? That is waiting for the BOO! stamp from the Pumpkin Chevron Stamp set. You can order all the products to create these treats on my website. See the list of items needed below. Contact me for cutting dimensions.
Now...what would you like to receive in your treat bag?
Supplies needed:
X7198B Nevermore Paper Pack
Z2036 Slate Designer Creation Paper bags
Z3040 Thistle Extra Thick Twine
Tools needed:
B1488 Pumpkin Chevron Stamp set
Z2173 Slate ink
Z2647 Eggplant Ink
Z2105 Black Ink
Z3169 Artbooking Cricut Cartridge
In addition you will need some mini clothes pins.
May your treats be sweet!
Michele
You can create fun and cute ways to deliver your sweet goody this Halloween!
Here I used the Designer bags, Nevermore paper and the Artbooking Cricut cartridge to design tags for my treats. The little broom is a lollipop wrapped in a strip of Nevermore paper and tied with Thistle thick twine. Color the stick brown with the Shin Han markers (permanent so the ink won't run during consumption). Oh yeah...notice the blank white space? That is waiting for the BOO! stamp from the Pumpkin Chevron Stamp set. You can order all the products to create these treats on my website. See the list of items needed below. Contact me for cutting dimensions.
Now...what would you like to receive in your treat bag?
Supplies needed:
X7198B Nevermore Paper Pack
Z2036 Slate Designer Creation Paper bags
Z3040 Thistle Extra Thick Twine
Tools needed:
B1488 Pumpkin Chevron Stamp set
Z2173 Slate ink
Z2647 Eggplant Ink
Z2105 Black Ink
Z3169 Artbooking Cricut Cartridge
In addition you will need some mini clothes pins.
May your treats be sweet!
Michele
October 08, 2015
Shin Han Markers are a great tool for your holiday crafting
Close to My Heart has been selling these markers for a year now and if you have not tried them, you should! I love how they color smoothly and easily and use them to brighten my artwork.
Here's a container that I covered with cardstock and then used a PML card as the focal point. This particular card was very simple with an outlined design in green. I wanted to add a simple bit of color so I used the Carmine, Golden Yellow and Sap Green.
Here's a video showing you the benefits of the Shin Han markers and some techniques you can use to add color to your artwork! Green in the hair? Sounds like the days of pool chlorine damaged hair...so watch closely how it works with the Shin Han Markers.
These markers are $5.95 each but can be free with your hostess rewards.
Close to My Heart also has a perfect way to store your markers, keeping them in the horizontal position so the ink is equally distributed in both pen tips.
If you are interested in learning more about the markers, watch for my upcoming classes or contact me to schedule a mini class.
Thanks for stopping by.
Michele
Here's a container that I covered with cardstock and then used a PML card as the focal point. This particular card was very simple with an outlined design in green. I wanted to add a simple bit of color so I used the Carmine, Golden Yellow and Sap Green.
Here's a video showing you the benefits of the Shin Han markers and some techniques you can use to add color to your artwork! Green in the hair? Sounds like the days of pool chlorine damaged hair...so watch closely how it works with the Shin Han Markers.
These markers are $5.95 each but can be free with your hostess rewards.
Close to My Heart also has a perfect way to store your markers, keeping them in the horizontal position so the ink is equally distributed in both pen tips.
If you are interested in learning more about the markers, watch for my upcoming classes or contact me to schedule a mini class.
Thanks for stopping by.
Michele
October 06, 2015
Holiday Expressions Blog Hop
Welcome to our blog hop taking an in depth look that the products in the Holiday Expressions. The products in this seasonal book are available through Dec 31st, 2015 and will bring a sparkle to all your holiday celebrations and memories.
If you have come here from Michelle's Blog, you are hopping right along. After you have visited here, you will hop on over to Kathy's Blog to see her artwork.
I have been creating with many different products from this little book of goodness and have lots of kits and classes ready to go. It was hard to choose what to highlight but I think my favorite is the White Pine Cardmakers Workshop on the Go paired with the Twinkle stamp of the month.
What I love about the workshop on the go is that you have a pattern for three cards and you can use those same patterns with same paper packet and different stamps or change it up to different papers and stamps. Each kit has supplies to create 15 cards.
You can see here how I created the cards from the workshop on the go and then the same cards using the Twinkle stamp of the month. So fun, so easy, so fast! Here's a closer look at the cards created from the workshop on the go.
And here's a closer look at the cards created using the Twinkle stamp of the month.
And even better, these card kits are "refillable". Ask your consultant or contact me to see yow you can get additional paper, sparkles, twine and cards to create additional cards which may be needed for your holiday greetings.
Now if you want to see more artwork using the stamp of the month, remember there was a blog hop that you can start here featuring that set exclusively. And if you are ready to go on to Kathy's Blog, hop on to her site.
Thanks for stopping by and I look forward to sharing my classes and kits with you.
Michele
If you have come here from Michelle's Blog, you are hopping right along. After you have visited here, you will hop on over to Kathy's Blog to see her artwork.
I have been creating with many different products from this little book of goodness and have lots of kits and classes ready to go. It was hard to choose what to highlight but I think my favorite is the White Pine Cardmakers Workshop on the Go paired with the Twinkle stamp of the month.
What I love about the workshop on the go is that you have a pattern for three cards and you can use those same patterns with same paper packet and different stamps or change it up to different papers and stamps. Each kit has supplies to create 15 cards.
You can see here how I created the cards from the workshop on the go and then the same cards using the Twinkle stamp of the month. So fun, so easy, so fast! Here's a closer look at the cards created from the workshop on the go.
And here's a closer look at the cards created using the Twinkle stamp of the month.
And even better, these card kits are "refillable". Ask your consultant or contact me to see yow you can get additional paper, sparkles, twine and cards to create additional cards which may be needed for your holiday greetings.
Now if you want to see more artwork using the stamp of the month, remember there was a blog hop that you can start here featuring that set exclusively. And if you are ready to go on to Kathy's Blog, hop on to her site.
Thanks for stopping by and I look forward to sharing my classes and kits with you.
Michele
October 01, 2015
October Stamp of the Month: Twinkle Blog Hop
Welcome to the October Stamp of the month blog hop. This hop brings along with it that sneak peek at the upcoming holidays. If I am going to create gifts and cards for the holidays, now is the time to get started. The Twinkle stamp set is the perfect place to begin!
If you have arrived here from Lauren's Blog, welcome and you are on the right track! After your visit here, you will move on to visit Carol's Blog.
I have been using this stamp set to create cards, scrapbook pages and bags and tags for holiday gifting. Here I used many of the stamps to create a double page layout for my holiday photos.
The ornaments cut from the Artiste Cricut Cartridge, lights and tree cut from the Artistry Cricut Cartridge all remind me of family tree decorating!
Adding bitty sparkles puts the final twinkle on the page.
I hope you have been inspired while you have looked at my artwork. Now, remember you will move on to Carol's Blog and through the hop to seeing more inspirational artwork.
Remember to purchase this stamp set, contact your CTMH consultant or if you do not have one, you can contact me to get yours. Below is a collage of the products I used to create this scrapbook layout to make your shopping easier. All the items can be purchased on my website.
Items include:
Happy Stamping,
Michele
If you have arrived here from Lauren's Blog, welcome and you are on the right track! After your visit here, you will move on to visit Carol's Blog.
I have been using this stamp set to create cards, scrapbook pages and bags and tags for holiday gifting. Here I used many of the stamps to create a double page layout for my holiday photos.
The ornaments cut from the Artiste Cricut Cartridge, lights and tree cut from the Artistry Cricut Cartridge all remind me of family tree decorating!
Adding bitty sparkles puts the final twinkle on the page.
I hope you have been inspired while you have looked at my artwork. Now, remember you will move on to Carol's Blog and through the hop to seeing more inspirational artwork.
Remember to purchase this stamp set, contact your CTMH consultant or if you do not have one, you can contact me to get yours. Below is a collage of the products I used to create this scrapbook layout to make your shopping easier. All the items can be purchased on my website.
Items include:
- X7200B White Pines Paper Packet
- S1510 Twinkle Stamp set
- Z3170 Artiste Cricut Cartridge
- Z3190 Artistry Cricut Cartridge
- Z2105 Black Ink
- Z2116 Cranberry Ink
- Z2650 Fern Ink
- Z1263 Bitty Sparkles
Happy Stamping,
Michele
September 21, 2015
Have I mentioned that I LOVE watercoloring?
Adult coloring is all the rage right now...but I feel like I have been doing this for 13 years. Yes, stamping and coloring is therapeutic and relaxing for me and many of my customers and friends. Guess what, so is watercoloring. I will admit, I was a little hesitant about adding this medium to my papercrafting repertoire but I am so glad I didn't let that get in the way.
With just a bit of water, a few colors, and a bit of water color paper, this card background was simple to create and capture the colors of this fall season. The stamp images are added in archival black to give a bold sentiment.
Want to try watercoloring? I am hosting a Ladies Night out on Thursday September 24th 6:30-8:30. Stop by and give watercoloring a try. RSVP is helpful and bring your own adhesive. The create and take is FREE.
Products used to create watercolor cards are found on my website and shown in the collage below.
Happy painting,
Michele
With just a bit of water, a few colors, and a bit of water color paper, this card background was simple to create and capture the colors of this fall season. The stamp images are added in archival black to give a bold sentiment.
Want to try watercoloring? I am hosting a Ladies Night out on Thursday September 24th 6:30-8:30. Stop by and give watercoloring a try. RSVP is helpful and bring your own adhesive. The create and take is FREE.
Products used to create watercolor cards are found on my website and shown in the collage below.
Happy painting,
Michele
September 17, 2015
Cricut Artistry Collection
This new collection from Close to My Heart helps you to create cards, scrapbook pages, and all sorts of paper crafts with a variety of icons, shapes and an OH SO cute font!
You can see my artwork using this cartridge by going to the index in the right hand column and clicking on Artistry. And better yet, you can watch this 10 minute video that will show you the details of the cartridge, stamp sets and the added Enchantment Paper to complete this collection.
View Video Here
If you are interested in adding this cartridge to your creative tools, ask me how you can get it at a discount!
Chirp, Chirp,
Michele
You can see my artwork using this cartridge by going to the index in the right hand column and clicking on Artistry. And better yet, you can watch this 10 minute video that will show you the details of the cartridge, stamp sets and the added Enchantment Paper to complete this collection.
View Video Here
If you are interested in adding this cartridge to your creative tools, ask me how you can get it at a discount!
Chirp, Chirp,
Michele
September 15, 2015
Nat'l Stamping Month Brings You...
Trendy, fun stamps that capture the celebration of life.
Hello Life is a set of three coordinating stamp sets, although each has a special paper crafter in mind.
As I created my artwork, I couldn't help but use them interchangeably and I am really loving the watercolors. Such a fun new technique to play with.
The products I used to create this card are shown below. And, thanks to Jen Patrick for the inspiration to create this card. To see more artwork, visit the consultant blog hop starting here.
Stamping and painting,
Michele
Hello Life is a set of three coordinating stamp sets, although each has a special paper crafter in mind.
As I created my artwork, I couldn't help but use them interchangeably and I am really loving the watercolors. Such a fun new technique to play with.
Stamping and painting,
Michele
September 06, 2015
National Stamping Month: Hello Life Blog hop
Not one, or two but THREE fabulous stamp sets were created by CTMH to celebrate Nat'l Stamping month. Are you ready to see some fun! These stamps sets really celebrate life!
If you have arrived here from Darlys' Blog you are hopping right along. When you have finished here, you will move on to Paige's Blog for more artwork.
The three stamps sets were created with individual styles of paper crafting in mind, one for card making, scrapbooking and pocket scrapbooking but together, the coordinate beautifully and you get a discount when you purchase all three.
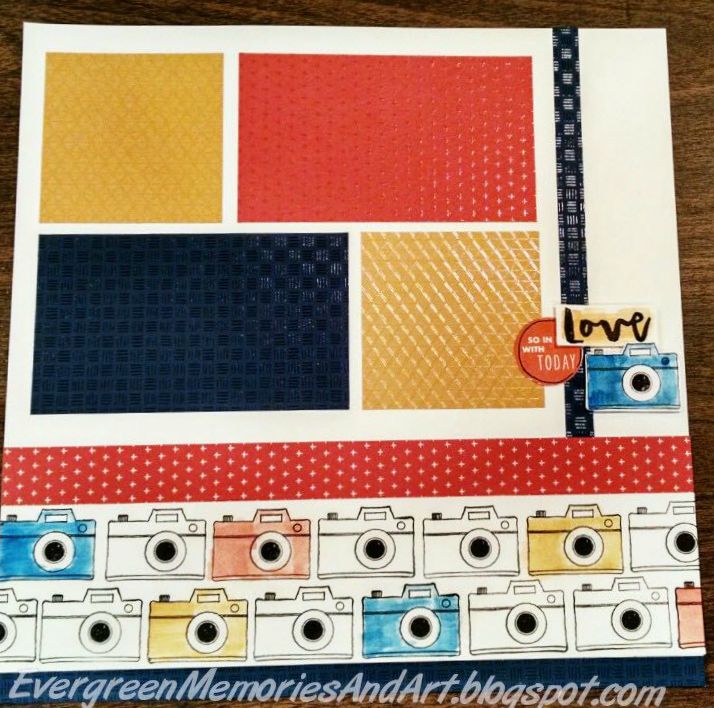
I pulled out my archival ink, new watercolors and brushes and started stamping away. I love the camera in the scrapbooking stamp set so I used it to create the borders on my pages. I then created my title, using images from all three stamp sets. The Enchantment Fundamental paper packet helps to add a bit of texture and the final touch is the watercolor paints to accent the words.
Thanks for stopping bye and here's to a great month of stamping!
Michele
If you have arrived here from Darlys' Blog you are hopping right along. When you have finished here, you will move on to Paige's Blog for more artwork.
The three stamps sets were created with individual styles of paper crafting in mind, one for card making, scrapbooking and pocket scrapbooking but together, the coordinate beautifully and you get a discount when you purchase all three.
I pulled out my archival ink, new watercolors and brushes and started stamping away. I love the camera in the scrapbooking stamp set so I used it to create the borders on my pages. I then created my title, using images from all three stamp sets. The Enchantment Fundamental paper packet helps to add a bit of texture and the final touch is the watercolor paints to accent the words.
Celebrate Nat'l stamping month with Close to My Heart during the month of September. The three Hello Life stamp set. Each set is $13.95 but when you purchase all three you pay only $34.95, a discount of $6.90. To order, visit your consultants website or, if you do not have a consultant, purchase here from me.
Some details.
Below is a list of the products I used to create these layouts. And remember, when you are done here, visit Paige's Blog to see what she has in store for you.
Thanks for stopping bye and here's to a great month of stamping!
Michele
Subscribe to:
Posts (Atom)


