I have started thinking of Valentine treat and have been posting some on Instagram (follow me @ Evergreenmemories). Here's a great video tutorial from Close to My Heart on creating a more masculine Valentine. And Jill shares so many techniques using watercolors, watercolor pencils, sparkles, and stars.
Enjoy!
Michele
So much more than crafting—it's about connection, community, and the friendships that blossom along the way. Yes, I offer workshops, classes, and retreats where I teach card-making, scrapbooking, and journaling techniques, but what truly matters is the sharing of stories, the support we give each other, and the laughter we share.
January 30, 2016
January 20, 2016
Seasonal Expressions 1 Blog Hop!
Did you know that CTMH has a new mini catalog full of wonderful, refreshing product? If you missed that announcement, then you are in the right place to get an artwork preview!
Filled with fresh new paper and stamps bringing a bit of spring to your winter! If you have arrived here from Kirsten's Blog then you are on the right track to hop through the consultant artwork from this featured catalog. From here, you will hop on over to Jeanie's Blog.
I love everything about this book but I am choosing to share with you my paper pieced Spring Critters.
This technique is easy to do with our new thin cuts. I stamped first on white paper and then again on the patterned paper. I then used the thin cuts to cut out both images and used scissors to hand cut off the extra paper that I would use in the image. So fun and easy.
I am new to thin cuts but I love that the CTMH cuts are packaged like our stamp sets; held on a magnetic sheet so they are easy to store and manage.
To see more products from the Spring Seasonal Expressions, visit your consultants website. If you do not have a consultant, you are welcome to shop with me.
Now remember you will be hopping on over to visit Jeanie's Blog.
Happy Stamping,
Michele
Filled with fresh new paper and stamps bringing a bit of spring to your winter! If you have arrived here from Kirsten's Blog then you are on the right track to hop through the consultant artwork from this featured catalog. From here, you will hop on over to Jeanie's Blog.
I love everything about this book but I am choosing to share with you my paper pieced Spring Critters.
This technique is easy to do with our new thin cuts. I stamped first on white paper and then again on the patterned paper. I then used the thin cuts to cut out both images and used scissors to hand cut off the extra paper that I would use in the image. So fun and easy.
I am new to thin cuts but I love that the CTMH cuts are packaged like our stamp sets; held on a magnetic sheet so they are easy to store and manage.
To see more products from the Spring Seasonal Expressions, visit your consultants website. If you do not have a consultant, you are welcome to shop with me.
Now remember you will be hopping on over to visit Jeanie's Blog.
Happy Stamping,
Michele
January 09, 2016
More than just one way to Live Your Day!
The Live Your Day Picture My Life deck of cards is only available during the month of January. I used mine to create this fun birthday book... (can be seen in its entirety here)
but watch this video from our home office and you can even more ideas on how to use this wonderful stack of cards.
What will you do with your sets? Order yours from my website today.
Happy scrapping,
Michele
but watch this video from our home office and you can even more ideas on how to use this wonderful stack of cards.
What will you do with your sets? Order yours from my website today.
Happy scrapping,
Michele
January 07, 2016
Introducing Charlotte
With the new year comes three new paper packs in the Close to My Heart selection. Today you are getting a look at the paper packet possibly named after a princess, Charlotte.
The colors featured in this paper packet include black, champagne, slate, sorbet, whisper, and white daisy. I also added some smoothie for a little vibrancy. And something you should know about these new paper packets is they have new features. All the papers in the kit are double sided patterned paper. With some prints that are more subdued than other so they create a perfect combination for your artwork. If you feel you need to add some solid cardstock, it is available from our Annual Inspiration idea book.
You will also notice that the paper packets have a new name for the workshops, Workshops Your Way. These are set up for scrapbookers AND card makers.
In addition to all this product, Close to My Heart includes online access to a cutting and creative guide for scrapbook pages and cards. As an example, you can see the guide for the Charlotte Workshop HERE.
Finally, here are the cards that you can create when you add the Springtime Wishes stamp set.
Join the fun today! Order your workshop your way and create at home or visit my Calendar of Events and attend one of my workshops.
Happy Stamping,
Michele
Products used:
G1104 Charlotte Workshop Your Way
C1641 Springtime Wishes Stamp set
Z3201 Springtime Wishes Thin Cuts
Z2164 Sorbet Ink Pad
Z2196 Smoothie Ink Pad (I substituted for the Sorbet for a little more vibrant color)
Z899 Momento Ink Pad
Z3132 Watercolor Paints
X254 White Cards and Envelopes
Z3188 Watercolor Brushes
Z2060 Thin Foam Tape
The colors featured in this paper packet include black, champagne, slate, sorbet, whisper, and white daisy. I also added some smoothie for a little vibrancy. And something you should know about these new paper packets is they have new features. All the papers in the kit are double sided patterned paper. With some prints that are more subdued than other so they create a perfect combination for your artwork. If you feel you need to add some solid cardstock, it is available from our Annual Inspiration idea book.
You will also notice that the paper packets have a new name for the workshops, Workshops Your Way. These are set up for scrapbookers AND card makers.
In addition to all this product, Close to My Heart includes online access to a cutting and creative guide for scrapbook pages and cards. As an example, you can see the guide for the Charlotte Workshop HERE.
Finally, here are the cards that you can create when you add the Springtime Wishes stamp set.
Join the fun today! Order your workshop your way and create at home or visit my Calendar of Events and attend one of my workshops.
Happy Stamping,
Michele
Products used:
G1104 Charlotte Workshop Your Way
C1641 Springtime Wishes Stamp set
Z3201 Springtime Wishes Thin Cuts
Z2164 Sorbet Ink Pad
Z2196 Smoothie Ink Pad (I substituted for the Sorbet for a little more vibrant color)
Z899 Momento Ink Pad
Z3132 Watercolor Paints
X254 White Cards and Envelopes
Z3188 Watercolor Brushes
Z2060 Thin Foam Tape
January 06, 2016
National Paper Crafting Month Blog Hop: Live Your Day
January is National Paper Crafting month and Close to My Heart is offering a wonderful special to celebrate.
Live Your Day is a collection of Picture My Life cards designed to coordinate perfectly with the sensational Everyday Life 2016 Planner Pages and My Crush Everyday Life Pages. You can seamlessly integrate pocket scrapbooking into your 2016 planner or on their own, these cards make it easy to preserve your everyday moments all year long.
As you travel through this blog hop, you will see a variety of unique ideas on how you can use these cards to create fun artwork! If you have arrived here from Jaquelin's Blog, you are hopping right along. When you are ready to move along, you will be visiting Traci's Blog.
Now here is what I created with these cards. I find the need to keep birthdays on a perpetual calendar to refer to each month and plan to create and send cards. So, I used this set, the Artistry Cricut Cartridge, My Creations Mini Book and some fun white glitter paper to create My Birthday Book with birthday icons.
This set includes 20 4x6 cards and 20 4x3 cards. I used the 4x3 "month" cards and "birthday list and then decorated the 4x6 cards in between to make it fun!
Live Your Day is a collection of Picture My Life cards designed to coordinate perfectly with the sensational Everyday Life 2016 Planner Pages and My Crush Everyday Life Pages. You can seamlessly integrate pocket scrapbooking into your 2016 planner or on their own, these cards make it easy to preserve your everyday moments all year long.
As you travel through this blog hop, you will see a variety of unique ideas on how you can use these cards to create fun artwork! If you have arrived here from Jaquelin's Blog, you are hopping right along. When you are ready to move along, you will be visiting Traci's Blog.
Now here is what I created with these cards. I find the need to keep birthdays on a perpetual calendar to refer to each month and plan to create and send cards. So, I used this set, the Artistry Cricut Cartridge, My Creations Mini Book and some fun white glitter paper to create My Birthday Book with birthday icons.
This set includes 20 4x6 cards and 20 4x3 cards. I used the 4x3 "month" cards and "birthday list and then decorated the 4x6 cards in between to make it fun!
Each month of the year is represented like this January page.
And in the final page, I made a pocket to keep stamps!
You can purchase the Live Your Day card set from your consultant or if you would like to create this book and are local, please see my Calendar of Events and sign up for the workshop. If you are not local and do not have a consultant, contact me about getting a kit to go with instructions to create your own Birthday Book.
Now remember to hop on over to Traci's Blog to see what she has created with the Live Your Day card set.
Happy Creating,
Michele
January 01, 2016
January Stamp of the Month Blog Hop: Beloved Bouquet
Happy New Year and welcome to the January stamp of the month blog hop! I hope you will find the artwork you see inspirational and urge you to begin creating regularly in the new year.
If you have arrived here from Lauren's Blog, then you are following right along. When you have completed your visit here, you will hop on over to Michelle's Blog to see what she has created. Now to see the Beloved Bouquet stamp set!
The stamp set this month is a great set to try two step stamping technique. The solid stamp is stamped with a lighter ink and placed first on your paper and then the lined stamp is inked in a darker color and then stamped over top the first stamp. This is an especially great result for flowers.
So here is the card I created using this technique. You can see the two step stamping technique on the flower and leaves.
To create this card, I used the La Vie En Rose paper and the Beautiful You Picture My Life cards. This combination of products creates a great back drop for the designs in this stamp set.
This card is the same layout with just a switch of the focal point from the left to the right. And the image I stamped using the "baby's breath" stamp was first, second and third generation stamped in the pomegranate color to provide more depth of the image.
As a reminder, each month, CTMH offers a stamp of the month. This stamp set can only be purchased during that month. With a $50 order, the stamp set is only $5. You can also purchase it for $17.95...but who doesn't like a good deal. Contact your consultant to purchase yours or if you do not have a consultant, I am happy to help you.
Remember to hop on over to Michelle's Blog and enjoy her creations!
Happy New Year,
Michele
If you have arrived here from Lauren's Blog, then you are following right along. When you have completed your visit here, you will hop on over to Michelle's Blog to see what she has created. Now to see the Beloved Bouquet stamp set!
The stamp set this month is a great set to try two step stamping technique. The solid stamp is stamped with a lighter ink and placed first on your paper and then the lined stamp is inked in a darker color and then stamped over top the first stamp. This is an especially great result for flowers.
So here is the card I created using this technique. You can see the two step stamping technique on the flower and leaves.
To create this card, I used the La Vie En Rose paper and the Beautiful You Picture My Life cards. This combination of products creates a great back drop for the designs in this stamp set.
This card is the same layout with just a switch of the focal point from the left to the right. And the image I stamped using the "baby's breath" stamp was first, second and third generation stamped in the pomegranate color to provide more depth of the image.
As a reminder, each month, CTMH offers a stamp of the month. This stamp set can only be purchased during that month. With a $50 order, the stamp set is only $5. You can also purchase it for $17.95...but who doesn't like a good deal. Contact your consultant to purchase yours or if you do not have a consultant, I am happy to help you.
Remember to hop on over to Michelle's Blog and enjoy her creations!
Happy New Year,
Michele
December 18, 2015
Beautiful You!
Yes that's right! You are beautiful! I often have a hard time believing that about myself but every day I make an effort to celebrate who I am even if it is just for a moment.
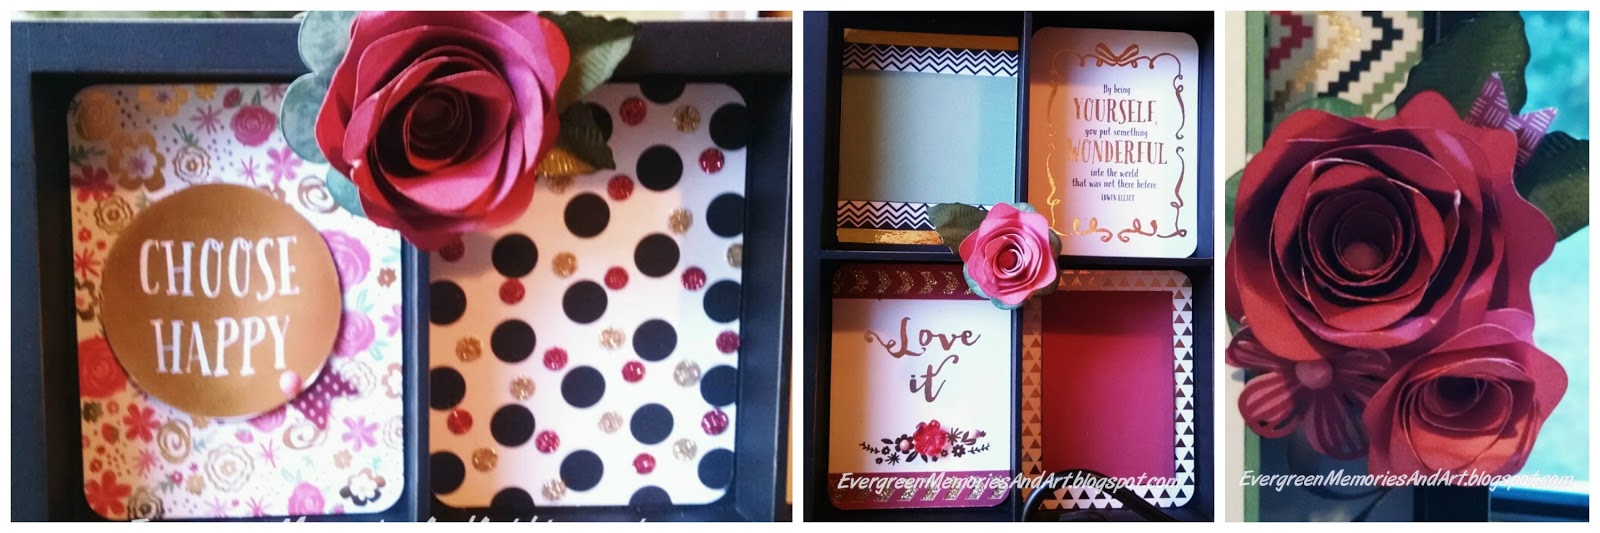
With this thought in mind, I was inspired by Beckie Lehman's use of the Picture My Life card set to create a display board that I can add photos to that celebrate me!
I love the gold foil accents on the cards and adding Pomegranate Fundamental Assortment, Gold Shimmer Trim and Gold Foil tape to highlight them even more. The new Pomegranate color is such a great color for the rolled roses cut from the Artiste Cricut cartridge and I added a little Cotton Candy as well.
And then, what do you do with the leftover cards? Why you use them to create more of course!
So I took the leftover cards and the La Vie En Rose paper packet and made three double page layouts. Sticking with the same gold shimmer trim and pink enamel gems, I added some flowers cut from the Artistry Cricut cartridge to add whimsy to the design. (This was inspired by Chris Lothian) Ahhh, love how it turned out.
And guess what, I still had Picture My Life cards left so I started creating cards! More La Vie En Rose, gold shimmer trim, pink enamel gems and a few card bases. Easy to create greeting cards were made in a flash! Here are just three of the cards out of the 12 I created. I repeated the card design and will have more cards to share later!
Finally, yes, I had saved out some special cards. They were so pretty and I tend to hoard the pretty ones. But I decided to create a banner with them! The projects seem endless and fun!
Treat yourself to a celebration of YOU and create with these Beautiful You cards as well. I am hosting a workshop in my home on Sunday January 9th. You can choose the project or set of projects you would like to complete from just this one set of Picture My Life Cards. Whether you order a kit to go or sign up for the class by Dec 30th, I will supply the Cricut cuts and ribbon for you to create the banner for FREE! Contact me today!
With this thought in mind, I was inspired by Beckie Lehman's use of the Picture My Life card set to create a display board that I can add photos to that celebrate me!
I love the gold foil accents on the cards and adding Pomegranate Fundamental Assortment, Gold Shimmer Trim and Gold Foil tape to highlight them even more. The new Pomegranate color is such a great color for the rolled roses cut from the Artiste Cricut cartridge and I added a little Cotton Candy as well.
And then, what do you do with the leftover cards? Why you use them to create more of course!
So I took the leftover cards and the La Vie En Rose paper packet and made three double page layouts. Sticking with the same gold shimmer trim and pink enamel gems, I added some flowers cut from the Artistry Cricut cartridge to add whimsy to the design. (This was inspired by Chris Lothian) Ahhh, love how it turned out.
And guess what, I still had Picture My Life cards left so I started creating cards! More La Vie En Rose, gold shimmer trim, pink enamel gems and a few card bases. Easy to create greeting cards were made in a flash! Here are just three of the cards out of the 12 I created. I repeated the card design and will have more cards to share later!
Finally, yes, I had saved out some special cards. They were so pretty and I tend to hoard the pretty ones. But I decided to create a banner with them! The projects seem endless and fun!
Treat yourself to a celebration of YOU and create with these Beautiful You cards as well. I am hosting a workshop in my home on Sunday January 9th. You can choose the project or set of projects you would like to complete from just this one set of Picture My Life Cards. Whether you order a kit to go or sign up for the class by Dec 30th, I will supply the Cricut cuts and ribbon for you to create the banner for FREE! Contact me today!
December 06, 2015
Stamping Techniques Blog Hop
This month our blog hop group wants to share some new and not so new but fun stamping techniques with you. During our Creative Live event in November, we were reminded of how simple and easy some of these techniques can be and how much they add to our artwork! It is fun to take favorite stamp set to a new level and try a new twist!
So, welcome to the technique blog hop. If you have arrived from Brenda's blog, you are on the right track. From here, you will move on to Darlys' Blog to see what she is sharing.
Since it is the holiday season, I added a little "mistletoe" to the mix and am sharing the kissing technique with you! Yes, stamp kissing is a technique. To do this, you take a solid stamp, like the tree base from this set, and you "kiss" a more line drawn stamp to it and you get a design on the solid stamp that will show when you stamp the solid image.
Here's exactly how I did it.
1. I inked the solid stamp really well in the fern ink.
2. I used the small swag stamp and kissed it to the solid stamp. I used a VERY slight movement when they were kissed to assure an image transfer.
3. I wiped the swag stamp on my dry stamp scrubber to remove any transferred ink and then "rekissed" in a new spot.
4. I worked from bottom to top, moving the swag stamp up and altering the image side to side to avoid a repeating pattern.
5. I cut out the tree and added it to my card.
6. I added "bling" to the areas of the "kiss" that were "imperfect" or blank...a little bling covers a multitude of imperfect kisses.
Wah Lah! You have perfectly kissed trees.
Now bring a little mistletoe kissing to your stamping and give it a try?
Michele
So, welcome to the technique blog hop. If you have arrived from Brenda's blog, you are on the right track. From here, you will move on to Darlys' Blog to see what she is sharing.
Since it is the holiday season, I added a little "mistletoe" to the mix and am sharing the kissing technique with you! Yes, stamp kissing is a technique. To do this, you take a solid stamp, like the tree base from this set, and you "kiss" a more line drawn stamp to it and you get a design on the solid stamp that will show when you stamp the solid image.Here's exactly how I did it.
1. I inked the solid stamp really well in the fern ink.
2. I used the small swag stamp and kissed it to the solid stamp. I used a VERY slight movement when they were kissed to assure an image transfer.
3. I wiped the swag stamp on my dry stamp scrubber to remove any transferred ink and then "rekissed" in a new spot.
4. I worked from bottom to top, moving the swag stamp up and altering the image side to side to avoid a repeating pattern.5. I cut out the tree and added it to my card.
6. I added "bling" to the areas of the "kiss" that were "imperfect" or blank...a little bling covers a multitude of imperfect kisses.
Wah Lah! You have perfectly kissed trees.
Now bring a little mistletoe kissing to your stamping and give it a try?
Michele
December 03, 2015
Urban, Grunge, Metal, Wood and texture galore!
The Urban paper packet is perfect for the styles of 2015-16. The textures and colors are so fun to work with.
My downline Diana used the paper set in team swap and created these fun cards and layout.
You can shop for this paper and Cricut cartridges on my website. And remember, CTMH is hosting a Cyberweek Sale with 25% a selection of our great products. Join the Cyber Sale Party and you could win the hostess rewards!
Here's a video with some information and techniques using this paper.
Enjoy,
Michele
My downline Diana used the paper set in team swap and created these fun cards and layout.
Created with the Artistry Cricut Cartridge
Created with the Artfully Sent Cricut Cartridge (on sale Nov 30-Dec 4 for 25% off)
You can shop for this paper and Cricut cartridges on my website. And remember, CTMH is hosting a Cyberweek Sale with 25% a selection of our great products. Join the Cyber Sale Party and you could win the hostess rewards!
Here's a video with some information and techniques using this paper.
Enjoy,
Michele
December 01, 2015
December Stamp of the Month Blog Hop: Candlelight Garden
Another month brings another new stamp set to the collection. Thank you for joining us for the December Stamp of the Month blog hop.
If you have arrived here from Brenda's Blog, welcome! I hope you have enjoyed the artwork you have seen so far. When you have finished visiting here, hop on over to Jeanie's Blog to see what she has created.
Candlelight garden is such a fun stamp set! All I could think about is "what can I put in that jar?"
And because my craft table is cover with Christmas stamp sets and paper as I prep for upcoming workshops, I grabbed for what was closest.
So Christmas wishes in a jar is what I created first. I also had some other ideas of items to put in the jar...you will see those later this month.
Now remember, this stamp set is available during the month of December. Contact your consultant to purchase the set for $17.95 OR for $5 with a $50 order. If you need a CTMH consultant, feel free to shop with me on my website.
Now remember to hop on over to Jeanie's Blog to continue on and see more artwork.
How will you fill your jar?
Michele
If you have arrived here from Brenda's Blog, welcome! I hope you have enjoyed the artwork you have seen so far. When you have finished visiting here, hop on over to Jeanie's Blog to see what she has created.
Candlelight garden is such a fun stamp set! All I could think about is "what can I put in that jar?"
And because my craft table is cover with Christmas stamp sets and paper as I prep for upcoming workshops, I grabbed for what was closest.
So Christmas wishes in a jar is what I created first. I also had some other ideas of items to put in the jar...you will see those later this month.
Now remember, this stamp set is available during the month of December. Contact your consultant to purchase the set for $17.95 OR for $5 with a $50 order. If you need a CTMH consultant, feel free to shop with me on my website.
Now remember to hop on over to Jeanie's Blog to continue on and see more artwork.
How will you fill your jar?
Michele
Subscribe to:
Posts (Atom)